Import student and staff CSV files
Enable Imports and use Imports. The app supports student and staff imports. An import writes to the working campus. A student import places learners in sections of the working academic year. Select the campus and the Working academic year before you upload a student file.
| Task | Permission |
|---|---|
| See imports and their rows | read import |
| Upload and check a file | create import |
| Write or drop a checked import | apply import |
Checking and writing are separate permissions.
Check and apply a file
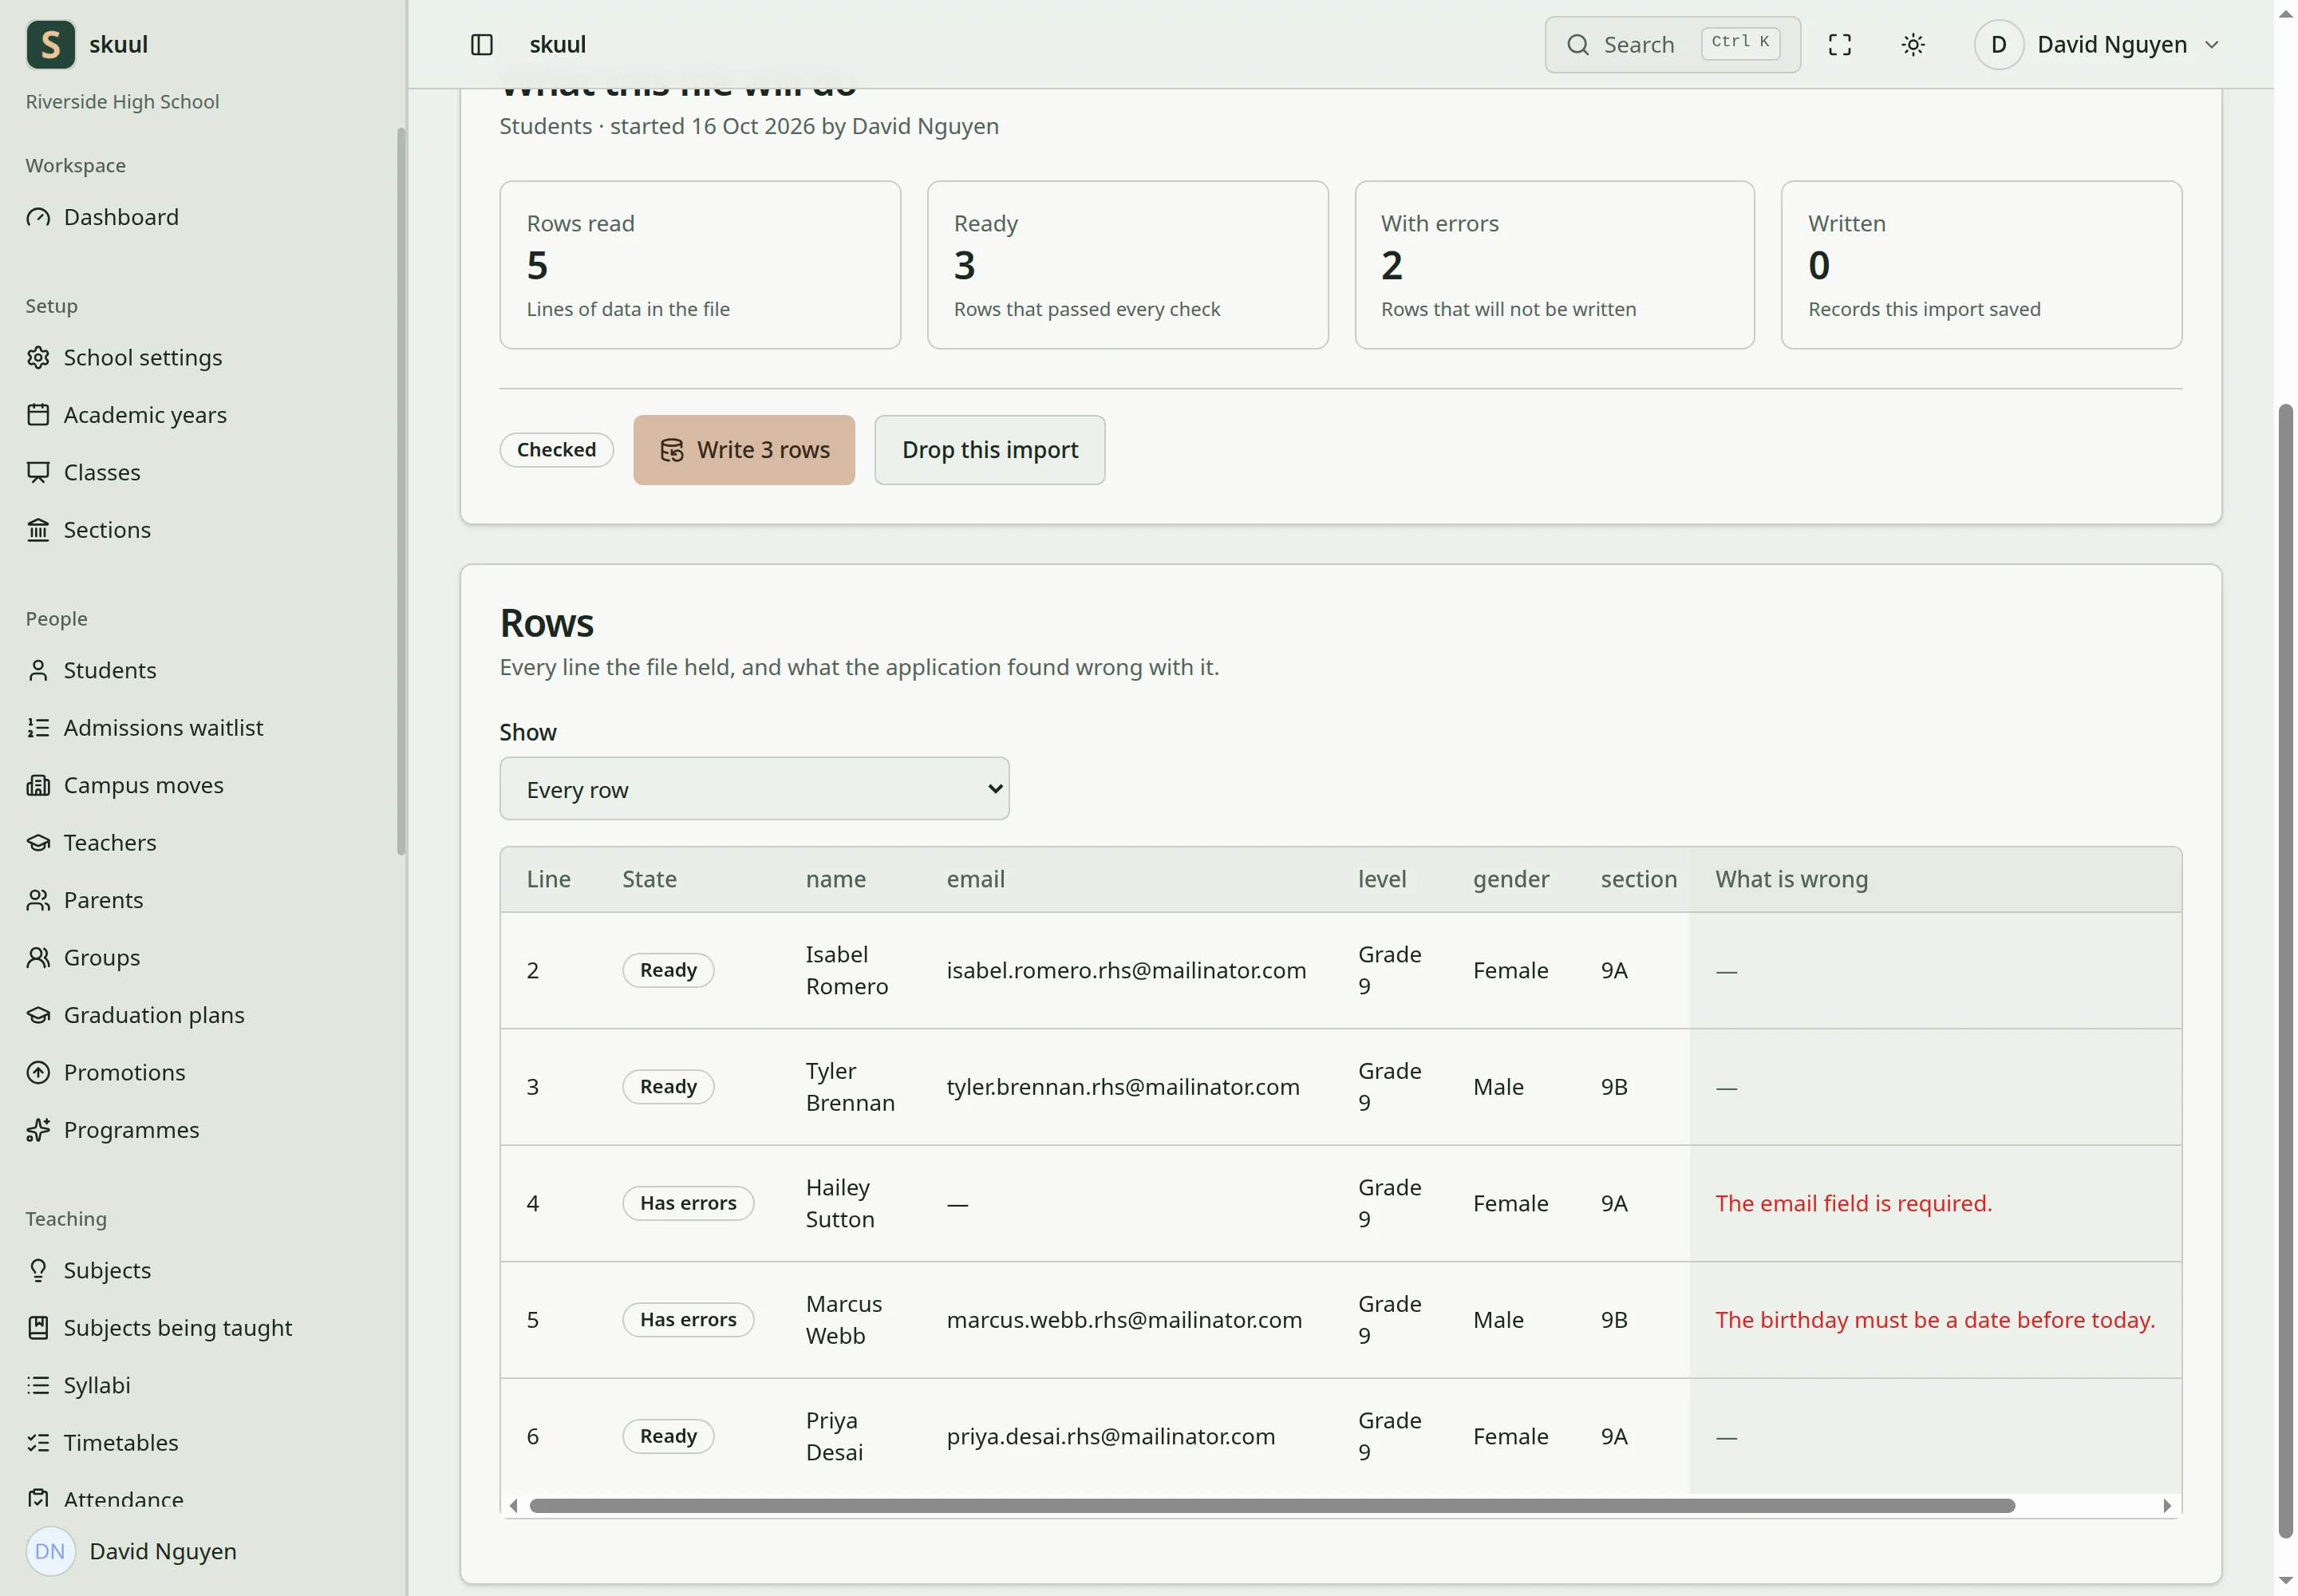
Checking a file does not apply its rows.
- Prepare a CSV file. The first line must name the columns.
- Open Imports.
- Under Import a file, select What the file holds: Students or Staff.
- Select the CSV file. The maximum size is 5 MB.
- Select Check the file.
- On the import page, read Rows read, Ready, With errors, and Written.
- Read What is wrong for each row with the state Has errors.
- Select Write N rows to write the rows that are Ready.
- Read the row states again. Each row shows Written or Has errors.
Checking makes a staged import. It does not create or change people. The import page shows Nothing is written yet until you write the rows. Rows with errors are left alone. They do not stop the rows that are Ready. Each row is written in its own transaction. A row that fails does not undo earlier rows.
The check tests the level and section names, the dates, and the gender value. The write also checks these items:
- An admission number that is already in use.
- A learner who attends another campus, or a person who works as staff.
A row that fails at write time changes to Has errors and shows the reason, for example Admission number A-104 is already used in this school.
An import runs once. After the write, the page shows Written on 16 Oct 2026. An import runs once. To stop an import, select Drop this import and confirm. The import state changes to Cancelled. Import states are Draft, Checked, Applied, Failed, and Cancelled. Row states are Pending, Ready, Has errors, Written, and Skipped.
The Imports so far list shows each file, its state, and its row counts. Use What the file held and State to filter the list. Select View rows to open an import.
Student columns
Required: name, email, birthday, level, section.
Optional: source_id, gender, admission_number, admission_date, address, city, state, nationality, phone.
The column order does not matter. Column names are not case-sensitive. Use level and section names that exist on the working campus in the working academic year. Write dates as YYYY-MM-DD. The birthday must be before today. The email domain must be able to receive mail. Gender values are Male, Female, Non-binary, or Prefer not to say. If admission_number is empty, the app makes the next admission number. A learner who attends another campus needs a transfer or a campus move.
Staff columns
Required: name, email.
Optional: source_id, birthday, gender, staff_number, job_title, department, employment_type, joined_on, address, city, state, nationality, phone.
Write birthday and joined_on as YYYY-MM-DD. Gender values are the same as for students. Employment values are full_time, part_time, contract, volunteer, or intern. staff_number accepts 30 characters. A staff import creates or updates the staff profile and its account. It does not assign subjects or teaching work. A learner cannot be imported as staff. The check passes the row. The write step then shows This person is still a learner. A learner cannot be made staff.
Use stable source identifiers
Use source_id to identify the same source record in later imports. Keep it stable for that import type on the campus. The app then updates the record that it linked before. It does not make a duplicate. Two rows in one file cannot have the same source_id. Check row errors and the resulting records before you send invitations.
Correct an import safely
If the check shows errors, correct the CSV file and upload it again as a new import. Keep the same source_id values for records that you imported before. After a write, read the row results before you prepare another file. Do not remove written accounts to run the file again.
The write runs while the page waits. It is not a queued job. If the connection times out, open the import again from Imports so far. Do not assume that no rows were written.
| Problem | Action |
|---|---|
| The CSV file field is required. | Select a file before you select Check the file. |
| Choose what the file holds. | Select Students or Staff under What the file holds. |
| The file is missing these columns: birthday, level, section. | Add the named columns to the first line. |
| The email must be a valid email address. | Correct the address. Make sure the mail domain can receive mail. |
| The birthday does not match the format Y-m-d. | Write the date as YYYY-MM-DD, for example 2012-04-01. |
| The birthday must be a date before today. | Correct the birthday. |
| There is no level called Grade 99. | Use the exact level name on the working campus. |
| The level Grade 9 has no section called 9Z in this cycle. | Use the exact section name. Check the Working academic year. |
| The selected gender is invalid. | Use one of the four gender values. |
| A learner attends another campus | Use a transfer or a campus move. Do not import another identity. |
| No row passed the check, so there is nothing to write. | Correct the file and upload it again. |
| The request times out | Open the import and read the row states before you upload another file. |
See the reference guide's CSV examples for headers and date values.
Check the result
- Read the Written and With errors counts after the write.
- Open some of the new records. Check their campus and section.
- Confirm that the import shows Applied and no Write button.
See CSV examples and import design and accounts.